|
Eclipse – Importing RTF files with Audio
These steps are subject to
change by Eclipse. As such if the
steps in your particular version should deviate from the provided information
it as advised that you contact Eclipse for further assistance.
Audio on Stylus Machine
- Verify
your microphone is a stereo microphone or has the appropriate adapter.
- Plug
your microphone into the Stylus
- Turn
on the microphone if necessary
- On
Stylus – Tap Stylus in tool bar
- Tap
Options
- Tap
Audio
- Check
mark “Enable Audio Recording” if necessary
- Tap
OK
Transfer the Job with Audio to Eclipse
- Take
CF Card (the big one) from Stylus
- Insert
Card into Card Reader
- Open
StylusSync
- Hit
“Import Jobs from Card”
- Select
Text
- Check
mark Audio
- Check
mark the Job you want to Import
- Save
in (This only has to be done once)
- Click
Browse
- Find
and click the + sign in front of My Computer (unless it’s
already a -)
- Find
and click the + sign in front of C: drive
- Find
and click the + sign in front of Program Files
- Find
and click the + sign in front of Advantage Software
- Find
and click the + sign in front of Eclipse
- Find
and click the + sign in front of User
- Find
and click the name of the user
- Click
Ok
- Click
Import
- Follow
the prompts
- When
complete close StylusSync
- Remove
card from reader and replace in your Stylus
To Open File and Audio in
Eclipse:
- Open
Eclipse
- Hit
Tools in top tool bar
- Select
Convert
- Select
“From Another CAT System”
- Select
Text
- Select
RTF
- Click
Next
-
Select “Let Me Browse“
- Click
Next
Select the RTF file within your Eclipse file
listing
There should now be a usable Eclipse formatted file in your Eclipse listing
by this file name.
- Click
Open
- Click
Finish
To Get the Audio to Sync Up in
Eclipse:
- Go
into the Job - put cursor on first
word.
- Write down the Time code from the bottom tool bar (must be in
military time, example: 15:47:45:00)
- To
Change Time code in Eclipse to match that of your job
- Press
ALT + U
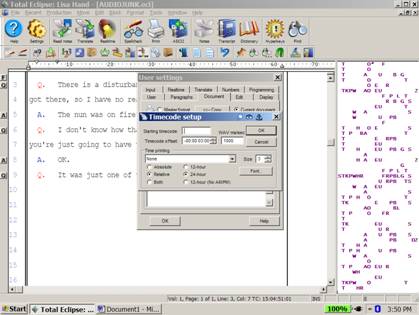
Select Document- Select
Time code
- Type
in the time code numbers in the “Starting Time code” block
- Click
OK
- Click
OK
|


